In another thread, somebody asked about how to make an object appears as it comes out of a stargate-alike event horizon thanks to Dynamic Paint… and I got this idea to do it without Dynamic Paint. While I was at it, I made the material so that it’s easy to make the object disappear and appear.
")
The node tree of the material:
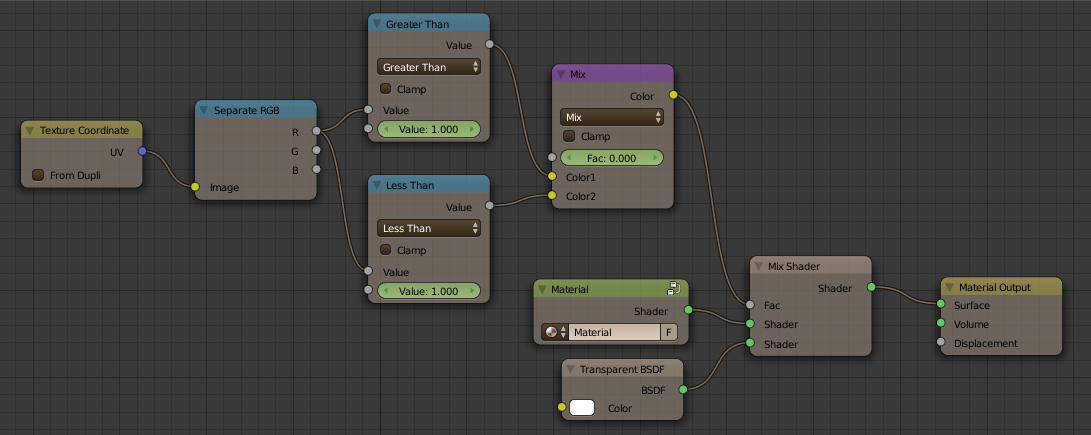
The Color Mix node is here to switch in between entering or exiting the event horizon depending on the factor, respectively 0 for entering and 1 for exiting.
Since Suzanne is a static object, I simply used the X coordinate of the UV map created with “Project from View (Bounds)”. When Suzanne touches the event horizon for the first time, the Color Mix factor is keyframed to 0 and the value in the “Greater Than” node is keyframed to 1. So that any point which is beyond the right limit of the UV map uses the fully transparent material. It means none since the UV coordinates are in the range 0 to 1. Then the value of the “Greater Than” node is keyframed to 0 when Suzanne is totally on the other side of the event horizon.
So, while Suzanne crosses the event horizon, the rubber ducky material is progressively replaced by the fully transparent one, starting from the right and that’s what makes her disappear. The effect synchronizes itself automatically with the event event horizon… At least, it works (almost) perfectly with both Suzanne’s movement keyframes and the node’s value keyframes set to Vector.
IMHO, it shouldn’t be that hard to synchronize the effect whatever the situation. It would be just a matter of tuning the keyframes and the values of the “Greater Than” node. To accelerate the transition, you bring the keyframes closer and you enlarge the range of the values to slow it down. (Below 0 and/or above 1.) As long as you keep using the whole range from 0 to 1 the effect works. (That’s pure theory but I’m very confident.) :eyebrowlift:
To use this effect on a rigged mesh, all that is needed is to replace the UV coordinates with Object coordinates. There are a few things to change because a character is usually built facing the negative side of the Y axis and the object coordinates range is from minus something to plus something… But that’s doable. It will just work, even if you make the character put their hand inside the event horizon and pull it out. The Object coordinates are relative to the origin of the object and so is the “threshold”. I can see it working just fine… in my head. ![]()
The blend file to deconstruct:
Forum Stargate.blend (188 KB)
Enjoy! ![]()
EDIT: I forgot to say: If the inside of Suzanne’s head appears all blue that’s because the material is double-sided. Rubber ducky on the outside and blue light inside. That’s all. Nothing complicate.
 The quick fake ocean material is good enough. All that really matter is Suzanne’s material. Besides, my little trick wouldn’t work so well if the event horizon wasn’t absolutely flat so… :no: No, no, no!