Recently I wrote a shader which produces a color (or a pointer into a colormap) based on the location of the shaded point.In this process, I calculate an interpolated value from a 3D block of data. My prototype consisted of a block of 3x3x3 values, so I needed to store 27 values in an array (the script takes care of mapping 3D positions into 2D array indexing). This works nicely.Now for a more real-life application, the number of values increases to about 5 million values. When I put this amount of data in an OSL script, blender starts compiling, but this process takes forever.What would be the best way to handle such an amount of data within an OSL script?Could I read data from a file, so the compiler is not bothered with the actual amount of data?Cheers.
OSL does have the ‘dict find’ function that allows an XML dictionary file to be read - but I don’t know if this is supported yet in Blender. OSL can also read/write point cloud data - but again, I don’t know if these Re supported.
(See https://raw.github.com/imageworks/OpenShadingLanguage/master/src/doc/osl-languagespec.pdf)
One “cheat” way to do it could be to save the pre-computed data into a texture file (e.g. RGB bitmap file(s)).This image file could be plugged into an OSL input node. The UV co-ordinates could then give access to the appropriate RGB pixel that contains the data. The image could be “partitioned” into groups of sub-images to allow you store more data.
Cheers Dylan
Sounds like a nice “cheat”
Could you give (or point me to) a small example on how to read such a texture file?
On what kind of format is such a file based?
Cheers, Alexis
Hi Alexis,
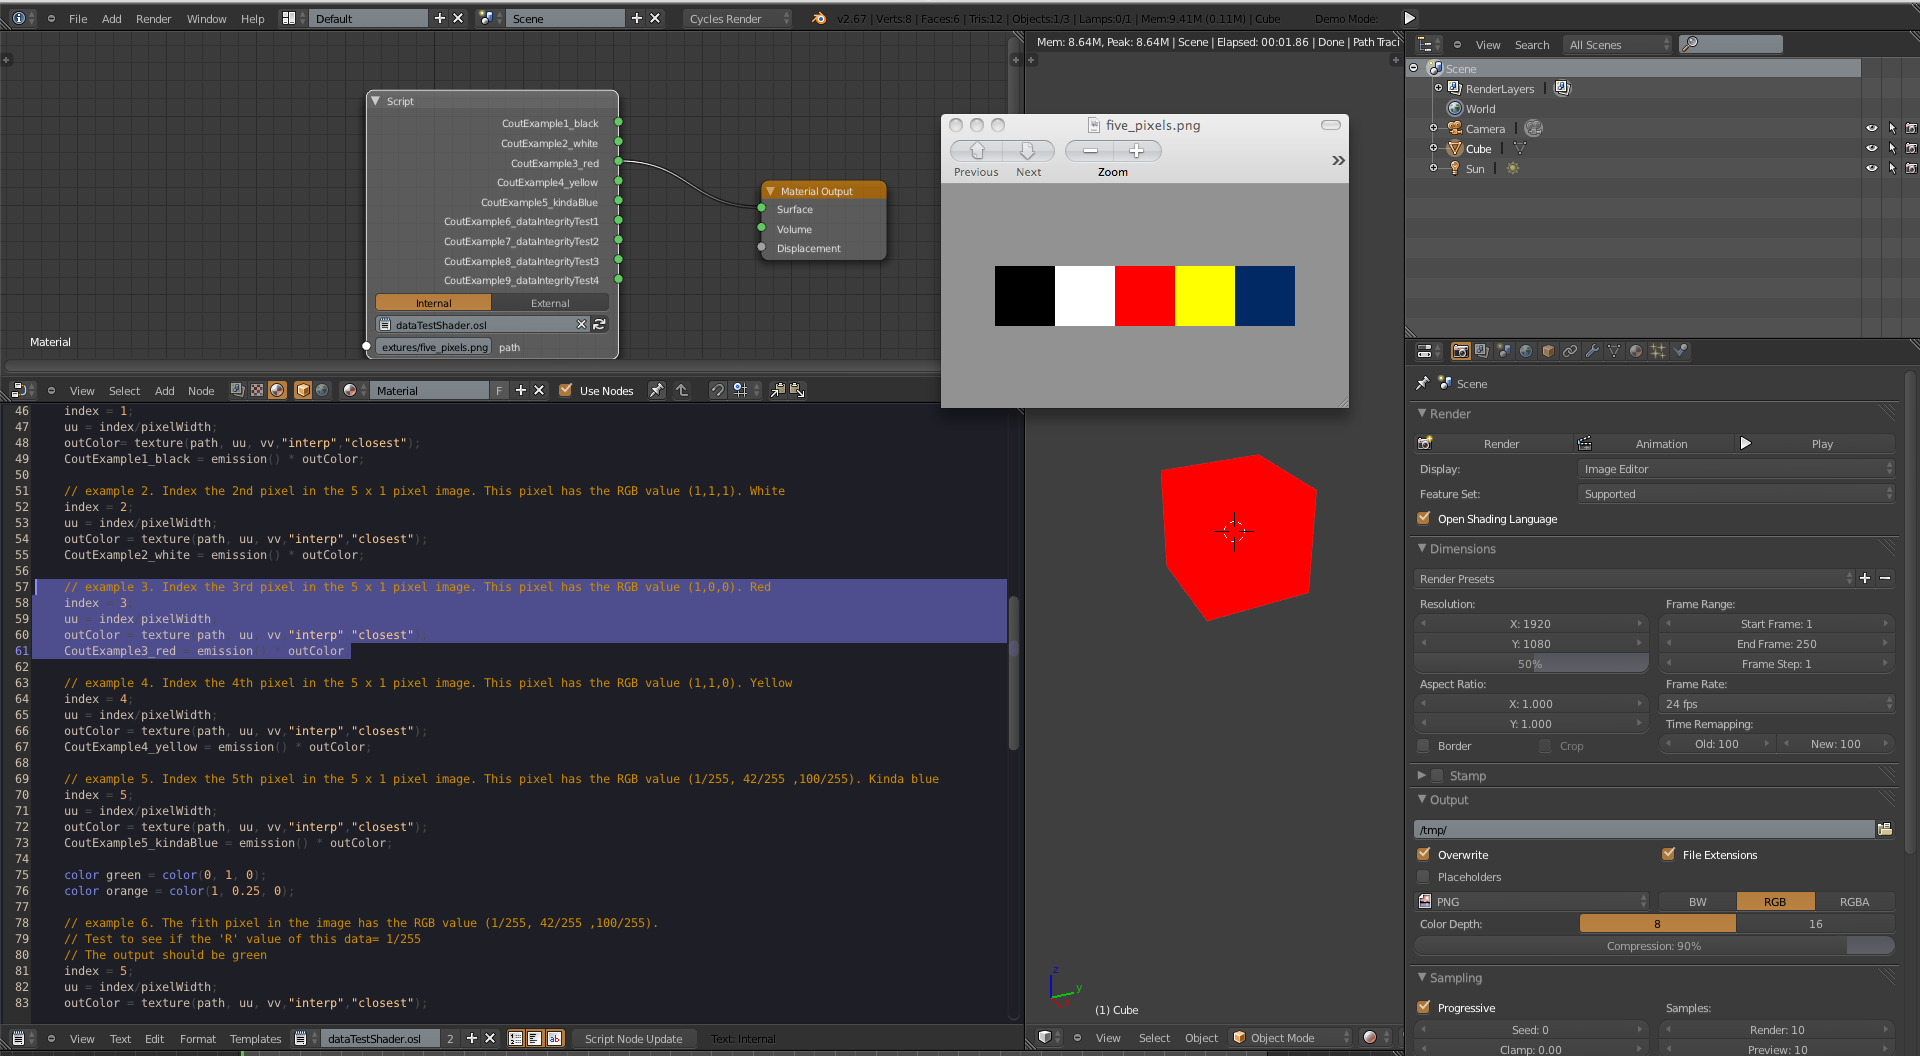
Here is a link to a .blend file example you can download to see how you might be able to use a texture file to store data. This zip file also contains an example .png and .bmp data texture (with 5 pixels => 15 data points in it).
There is a screen shot and a dump of the OSL code below.
Blend file instructions:
- Unzip
- Open the .blend. It seems to work best if you double click the file to open it in Blender (some times the image path doesn’t initialise otherwise!!!)
- The next step (after OSL is enabled) is to set the 3D view port with the cube to live RENDER mode.
If the CUBE is pink – then for some reason the texture image hasn’t been found.
Try to re-compile/update the script if this happens. - Connect the Shader outputs to the cube material to see the result of the example.
What does the example data shader do?
In a nutshell, this OSL example (pasted below) shows data being extracted from an image file that is 1 pixel deep and 5 pixels wide. To store more data, make the image bigger!!!
How does it work?
The key line that gets data from a texture image is: outColor = texture(path, uu, vv,“interp”,“closest”);
where:
- path is the path and filename of the image.
- uu and vv are the ‘x’ and y’ co-ordinates into the image.
- “interp”,“closest” prevents the texture(…) function from trying to interpolate between color values with neighbouring pixels.
If you add the parameters: “alpha”, myAlpha to the texture(…) function:
texture(path, uu, vv, “alpha”, myAlpha, “interp”,“closest”);
where myAlpha is a float, then you can retrieve four numbers for every pixel (if the image is alpha capable).
Note that all data returned by the texture(…) function will be in a float format in the range 0 to 1. You can scale/offset the data to get ‘any’ value you’d like.
To follow the examples in the code below, connect the corresponding example output node of the shader to the Material Output’s “Surface” node.
e.g. In the screen shot we are extracting the data from the 3rd pixel in the image (it’s red).
e.g. In Example 7, we are extracting the value “1” stored in the ‘Red’ value of the 5th pixel.
How do I get raw data into an image file?
To actually get your raw data into an image file (e.g. lossless .png or .bmp) you will either need to GOOGLE for a tool, or write one yourself (e.g. in C# or Python … maybe even GIMP etc). Maybe someone in these forums knows of a tool that could be used.
Is there a better way?
Probably!!! (As noted in the above posts!). But this looks like it could be useful.
I hope this helps. ![]()
Cheers
Dylan
// An example shader to demonstrate how data can be stored and retrieved from image textures.
// This shader was written in response to this question on Blender Artists.
// http://www.blenderartists.org/forum/showthread.php?314956-Data-storage-for-usage-within-OSL
//
// D.Whiteman 2013
//
// Usage:
// *** You may have to press the "Script Node Update" button.
// *** Set the 3D viewport in Blender to 'Render' to see the shader output results. *** <=====
// *** Don't forget to select CPU device and tick the Open Shader Language tick box.    <=====
//
// Connect one of the shader outputs below to the material output node of an object to see ***
// the result of each example. (e.g. make this the material shader for the default cube in Blender)


//
//
// Note: The special five pixel image used by this example should be stored in the 'textures' folder, otherwise
// the output color will be pink in Blender.
// The 5 pixel image was created in GIMP.
// One way of programmatically creating an image to store arbitrary data would be to write some code in C# or python (for example).


shader dataTestShader(
    string path = "//textures/five_pixels.png",     // the name of our special 'data' image. On a Mac, need to define here to work!!!
    output closure color CoutExample1_black = 0,
    output closure color CoutExample2_white = 0,
    output closure color CoutExample3_red = 0,
    output closure color CoutExample4_yellow = 0,
    output closure color CoutExample5_kindaBlue = 0,
    output closure color CoutExample6_dataIntegrityTest1 = 0,
    output closure color CoutExample7_dataIntegrityTest2 = 0,
    output closure color CoutExample8_dataIntegrityTest3 = 0,
    output closure color CoutExample9_dataIntegrityTest4 = 0)
{


    color outColor =0;
    float index = 0;
    int pixelWidth = 5;
    float uu = 0;
    float vv = 1;


    // example 1. Index the 1st pixel in the 5 x 1 pixel image. This pixel has the RGB value (0,0,0). Black
    // Note that the texture function has been told to use the closest pixel. If we do not specify this, then
    // the texture fuction will return an interperlated color (i.e. it will munge the data)
    index = 1;
    uu = index/pixelWidth;
    outColor= texture(path, uu, vv,"interp","closest");
    CoutExample1_black = emission() * outColor;

    // example 2. Index the 2nd pixel in the 5 x 1 pixel image. This pixel has the RGB value (1,1,1). White
    index = 2;
    uu = index/pixelWidth;
    outColor = texture(path, uu, vv,"interp","closest");
    CoutExample2_white = emission() * outColor;

    // example 3. Index the 3rd pixel in the 5 x 1 pixel image. This pixel has the RGB value (1,0,0). Red
    index = 3;
    uu = index/pixelWidth;
    outColor = texture(path, uu, vv,"interp","closest");
    CoutExample3_red = emission() * outColor;

    // example 4. Index the 4th pixel in the 5 x 1 pixel image. This pixel has the RGB value (1,1,0). Yellow
    index = 4;
    uu = index/pixelWidth;
    outColor = texture(path, uu, vv,"interp","closest");
    CoutExample4_yellow = emission() * outColor;

    // example 5. Index the 5th pixel in the 5 x 1 pixel image. This pixel has the RGB value (1/255, 42/255 ,100/255). Kinda blue
    index = 5;
    uu = index/pixelWidth;
    outColor = texture(path, uu, vv,"interp","closest");
    CoutExample5_kindaBlue = emission() * outColor;

    color green = color(0, 1, 0);
    color orange = color(1, 0.25, 0);

    // example 6. The fith pixel in the image has the RGB value (1/255, 42/255 ,100/255).
    // Test to see if the 'R' value of this data= 1/255
    // The output should be green
    index = 5;
    uu = index/pixelWidth;
    outColor = texture(path, uu, vv,"interp","closest");

    if (outColor[0] == 1.0/255.0)
        CoutExample6_dataIntegrityTest1 = emission() * green;
    else
        CoutExample6_dataIntegrityTest1 = emission() * orange;

    // example 7. The fith pixel in the image has the RGB value (1/255, 42/255 ,100/255).
    // Test to see how close the 'R' data vlaue is to 1.0
    // The output should be orange
    index = 5;
    uu = index/pixelWidth;
    outColor = texture(path, uu, vv,"interp","closest");

    if (outColor[0] == 1.00001/255.0)
        CoutExample7_dataIntegrityTest2 = emission() * green;
    else
        CoutExample7_dataIntegrityTest2 = emission() * orange;

    // example 8. The fith pixel in the image has the RGB value (1/255, 42/255 ,100/255).
    // Test to see if the 'B' value of this data= 100/255
    // The output will be will be orange, because the 100/255 fraction does not EXACTLY equal the value stored in  'B'.
    index = 5;
    uu = index/pixelWidth;
    outColor = texture(path, uu, vv,"interp","closest");

    if (outColor[2] == 100.0/255.0)
        CoutExample8_dataIntegrityTest3 = emission() * green;
    else
        CoutExample8_dataIntegrityTest3 = emission() * orange;

    // example 9. The fith pixel in the image has the RGB value (1/255, 42/255 ,100/255).
    // Test to see if the 'B' value of this data= 100/255
    // While it is not exactly 100/255, it is pretty close.
    // The output will be will be green,
    index = 5;
    uu = index/pixelWidth;
    outColor = texture(path, uu, vv,"interp","closest");

    if ( (outColor[2] > 100.0/255.0) && ((outColor[2] < 100.0001/255.0)))
        CoutExample9_dataIntegrityTest4 = emission() * green;
    else
        CoutExample9_dataIntegrityTest4 = emission() * orange;

}
Thanks for two great answers! Purchased the epub and indeed, it a very nice intro into OSL!
While I was looking at the “texture() solution” I came across the “texture3d()” call and this is precisely what I want!
Can anybody explain me how I can create a file suitable for reading by this function?
For instance: what is the supported file format, what convention is used in ordering the elements?
Any help is (again) greatly appreciated!
Cheers
To (partly) answer my question myself:
from the OSL source code I found that the file format which can be used for texture3d is “Field3D” which is also developed by sony and based on the general HDF5 file format.
Now I only need to write a conversion into this format based on the freely down-loadable lib.
Cheers
Hello,
does anybody have any experience writing field3d files which can be used through the OSL texture3d call?
I tried the use an example program:
//----------------------------------------------------------------------------//

/*
 * Copyright (c) 2009 Sony Pictures Imageworks
 *
 * All rights reserved.
 *
 * Redistribution and use in source and binary forms, with or without
 * modification, are permitted provided that the following conditions
 * are met:
 *
 * Redistributions of source code must retain the above copyright
 * notice, this list of conditions and the following disclaimer.
 * Redistributions in binary form must reproduce the above copyright
 * notice, this list of conditions and the following disclaimer in the
 * documentation and/or other materials provided with the
 * distribution.  Neither the name of Sony Pictures Imageworks nor the
 * names of its contributors may be used to endorse or promote
 * products derived from this software without specific prior written
 * permission.
 *
 * THIS SOFTWARE IS PROVIDED BY THE COPYRIGHT HOLDERS AND CONTRIBUTORS
 * "AS IS" AND ANY EXPRESS OR IMPLIED WARRANTIES, INCLUDING, BUT NOT
 * LIMITED TO, THE IMPLIED WARRANTIES OF MERCHANTABILITY AND FITNESS
 * FOR A PARTICULAR PURPOSE ARE DISCLAIMED.  IN NO EVENT SHALL THE
 * COPYRIGHT OWNER OR CONTRIBUTORS BE LIABLE FOR ANY DIRECT, INDIRECT,
 * INCIDENTAL, SPECIAL, EXEMPLARY, OR CONSEQUENTIAL DAMAGES
 * (INCLUDING, BUT NOT LIMITED TO, PROCUREMENT OF SUBSTITUTE GOODS OR
 * SERVICES; LOSS OF USE, DATA, OR PROFITS; OR BUSINESS INTERRUPTION)
 * HOWEVER CAUSED AND ON ANY THEORY OF LIABILITY, WHETHER IN CONTRACT,
 * STRICT LIABILITY, OR TORT (INCLUDING NEGLIGENCE OR OTHERWISE)
 * ARISING IN ANY WAY OUT OF THE USE OF THIS SOFTWARE, EVEN IF ADVISED
 * OF THE POSSIBILITY OF SUCH DAMAGE.
 */

//----------------------------------------------------------------------------//

/* Field3D examples - create and write

This sample application creates a DenseField object and writes it to disk.

*/

//----------------------------------------------------------------------------//

#include <iostream>
#include <string>

#include <Field3D/DenseField.h>
#include <Field3D/InitIO.h>
#include <Field3D/Field3DFile.h>

//----------------------------------------------------------------------------//

using namespace std;

using namespace Field3D;

//----------------------------------------------------------------------------//

int main(int argc, char **argv)
{
  // Call initIO() to initialize standard I/O methods and load plugins
  Field3D::initIO();

  DenseField<float>::Ptr field(new DenseField<float>);
  field->name = "hello";
  field->attribute = "density";
  field->setSize(V3i(3, 3, 3));
  // field->clear(1.0f);
  // field->metadata().setStrMetadata("my_attribute", "my_value");

  int counter = 0;
  for (DenseField<float>::iterator iter = field->begin();
       iter != field->end();
       ++iter) {

    *iter = ((float)++counter) / 27.0;
    cout << "Using value " << *iter << endl;
  }

  // These metadata field are extracted from the OSL example file
  // OpenShadingLanguage/testsuite/texture-field3d/dense_float.f3d
  field->metadata().setIntMetadata("field_type", 0);
  field->metadata().setIntMetadata("storage_type", 2);

  Field3DOutputFile out;
  out.create("field3d_file.f3d");
  out.writeScalarLayer<float>(field);
}

//----------------------------------------------------------------------------//
However, when I read this file in my OSL script, the call only returns the value 0.0, whichever point I use for input.
Any help is again greatly appreciated!
Cheers
Within blender the field3d file format is not supported, so I had to come up with another solution, based on the solution mentioned by Dylan (iReboot):
The method I now use is storing my data in a set of 2D png images, which are read by my OSL script.
I created a demo movie:
Here the plane and the ball are assigned the material which samples my 3D dataset to obtain an index into a colormap, so depending on the location the local color of the object is chosen.
If you are interested in using this technique, drop me a line, or visit my blog, where I will describe my method a bit more in depth and provide download links for the example movie blender+data files.