Solar System Simulator


This Add-on simulates planets in a solar systems according to Kepler’s laws of planetary motion. You set the orbit parameters via the physics-tab and the Add-on will calculate the orbit of the planet for you. Lengths are scaled down so that everything fits inside the scene, time can be animated to speed up or slow down the simulation.
A custom driver animates the planets, it works only when the Add-on is enabled. You can also bake the simulation, the driver will then be replaced by keyframed animation.

Version 0.7 for Blender 2.8, last updated 2020-07-03T00:00:00Z:
SolarSystemSimulator.zip (25.7 KB)

Also available on Github:

Overview:
The Addon creates panels in three different areas:
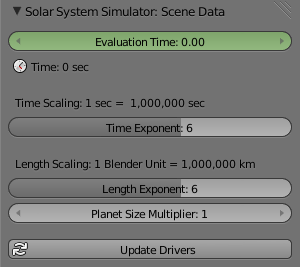
For global adjustments (time and dimensions) there is a panel in the scene-tab:

  • Animate the simulation time with keyframes.
  • Scale down lengths (because the real solar system is huge) and speed up time (to compress years into seconds).
  • Enable drawing of orbits in the 3D-Viewport.

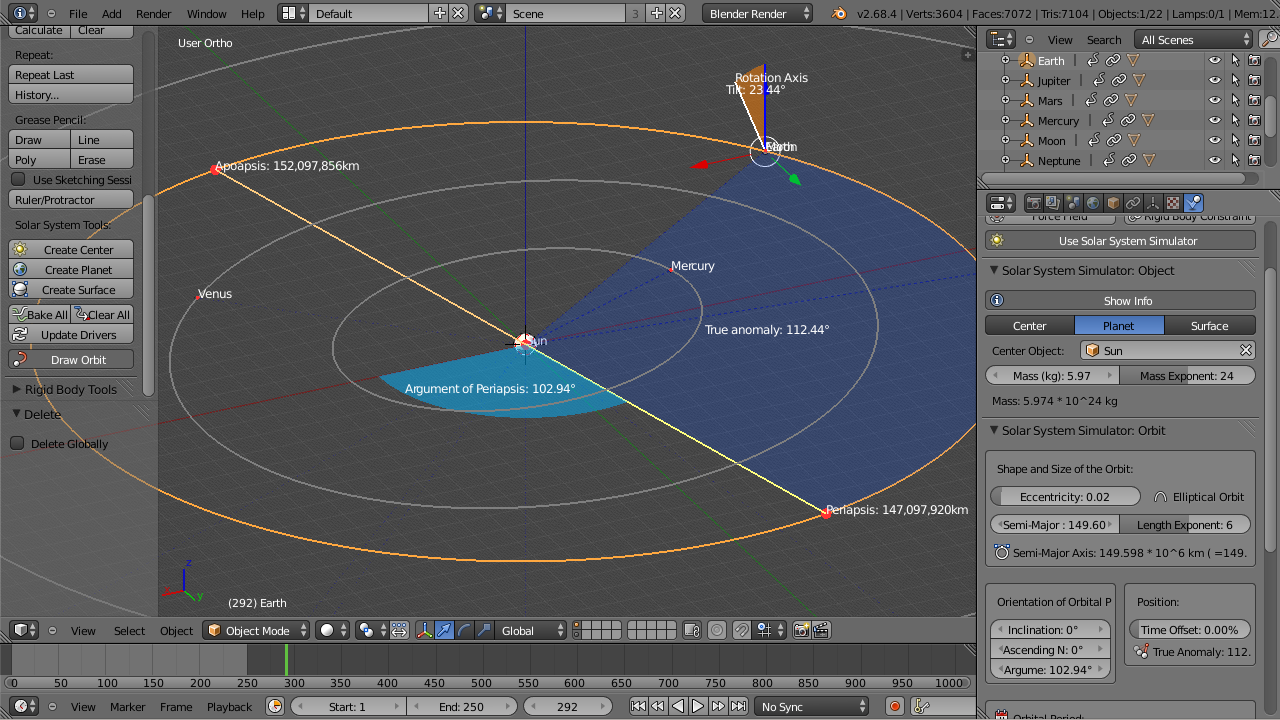
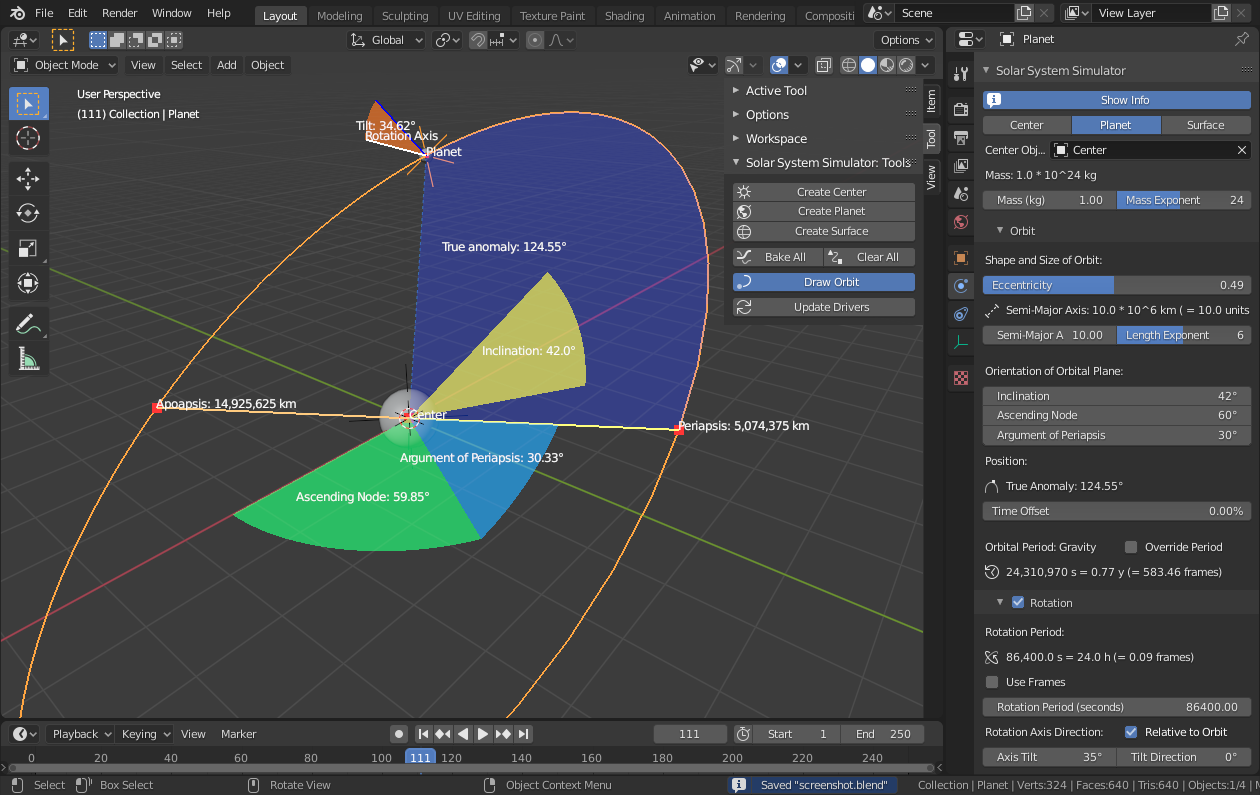
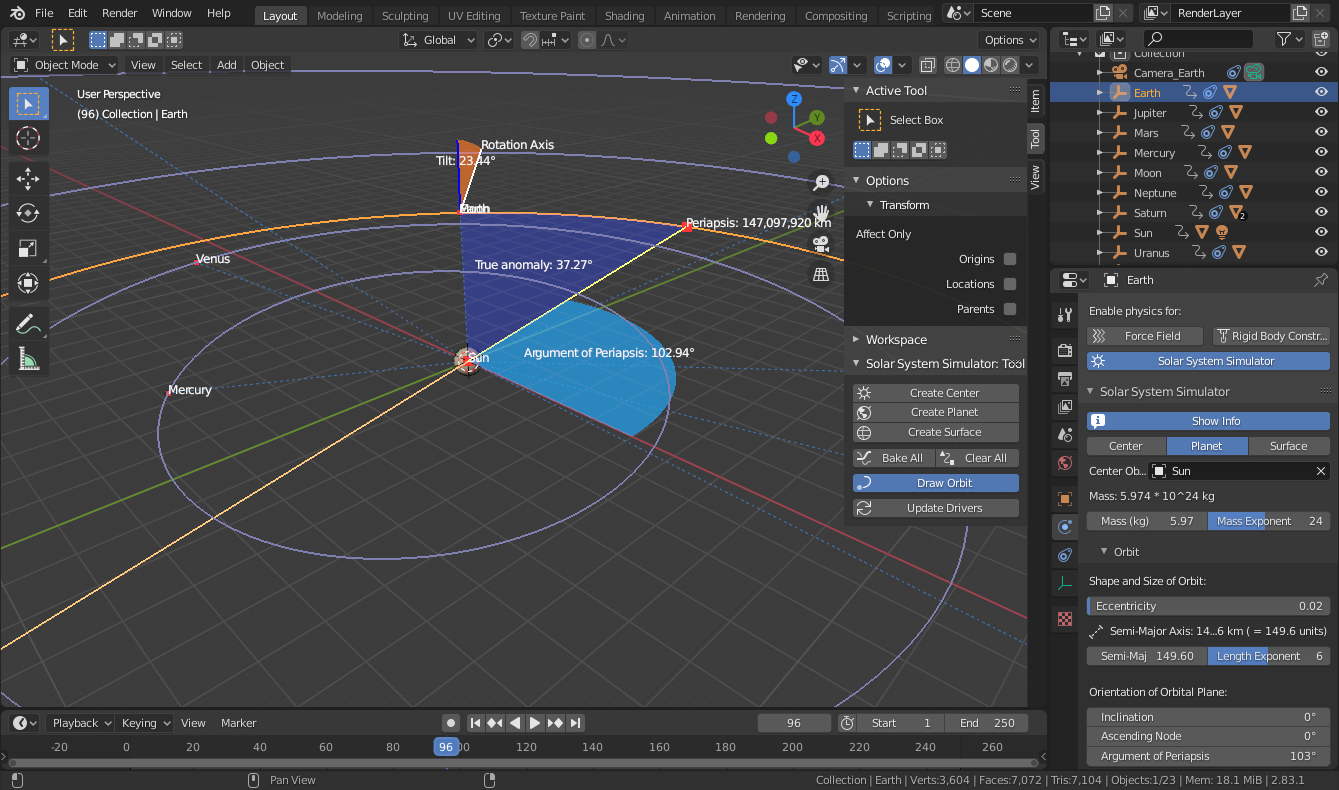
For the objects there is a panel in the physics-tab:
A simulated object is either a center a planet or a surface.

  • a center object is the basis of the solar system (like the sun),
  • planets orbit around this center (like the Earth) or around other planets (moons),
  • surface objects are the visible shell of the planets, they are just parented meshes which move and rotate with their planet.

For centers and planets you can

  • set the mass of the center which is used to calculate the orbital period of the planets,
  • change the size, shape and orientation of the orbit (only for planets),
  • let the object to rotate around its axis and tilt the axis with respect to the orbital plane,
  • bake the simulation to animation curves that work without the Add-on enabled.

There is also a panel in the 3D-Viewport sidebar (in the Tool-category) with some useful operators for quickly making solar systems.

How to let Earth orbit around the Sun
  1. Install the Add-on, in Blender you will find it in the Object-category.
  2. The drivers and simulation time animation have to be setup first. In the 3D-View go the the sidebar on the right, there is a panel in the Tool-tab titled “Solar System Simulator: Tools”. Click the buttons labeled “Add Simulation Time F-Curve” and “Update Drivers”.
  3. Now we can start with the solar system. In the toolbar click the “Create Center”-button and in the popup window set the name to “Sun”, “Mass (kg)” to 2 with “Mass Exponent” set to 30 (the Sun’s mass is about 2*10^30 kg). The Sun needs about 25 days for one rotation around its axis, set “Rotation Period (in seconds)” to 25 * 24 * 60 * 60, Blender will do the calculation. Also enable “Create Surface” and set “Radius (in km)” to 6.955, “Radius Exponent” to 5 (the Sun’s radius is about 695,500 km). Then click “OK”.
  4. The operator will create an empty (named “Sun”) together with a Mesh-Sphere (named “Sun_surface”). Now we add the Earth. Make sure the “Sun”-Empty is selected and use the “Create Planet”-button from the toolbar.
  5. In the popup window the “Center” property will be set to the active object (in this case “Sun”). Set the name of the planet to “Earth”. The Earth’s mass is about 5.9810^24 kg, the distance from the Sun is about 149.6 million km (149.610^6 km). The Earth’s rotation period is 1 day = 86,400 seconds and its radius is 6,370 km (= 6.37*10^3 km). Click OK and a new planet far away from the Sun will be created, you have to zoom out to see it.
  6. When you start the animation (spacebar) the earth will orbiting around the sun. You can also enable the “Draw Orbit” property in the toolbar to see the orbit.
  7. To refine Earth’s orbit select it (the empty, not the mesh Earth_surface) and go to the physics-tab. Make the orbit slightly elliptic by setting eccentricity to 0.02 in the “Orbit”-section of the panel. Also the rotation axis of the Earth is tilted by 23.4°, in the “Rotation”-section adjust the “Axis Tilt”-property.
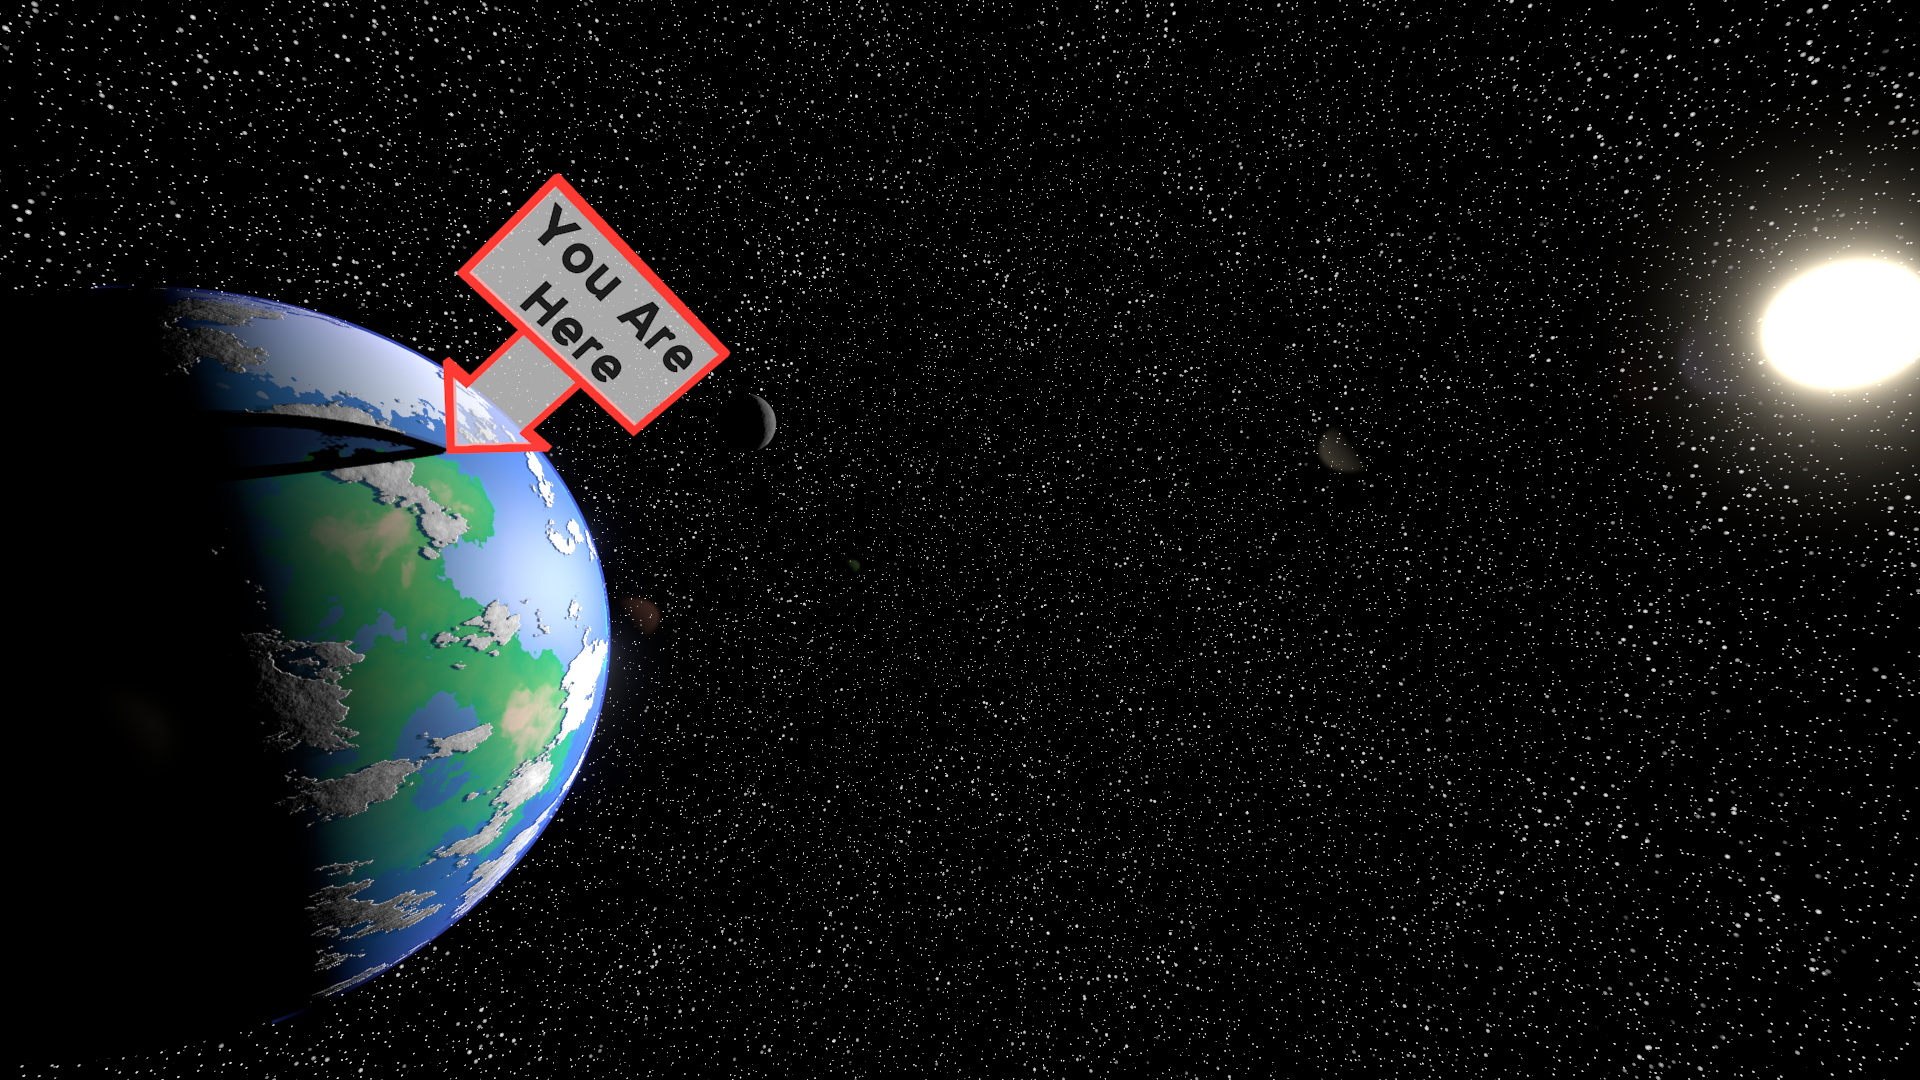
  8. At this scale the earth is really hard to see. To make it bigger you can go to the scene-tab and increase the “Planet Size Multiplier” to 10-100. This will artifically increase the radius of the surface without changing the distance between the Earth and the Sun. You can also change the scale of the solar system with the “Length Exponent” setting.
  9. To add more surfaces to the Earth (e.g. a cloud layer slightly bigger than 6,370 km) use the “Create Surface”-button from the Toolbar.
  10. If you want to save the orbit within the blend-file, use the “Bake All” operator from the toolbar. It will create location and rotation F-Curves for every simulated object.

Using information from Wikipedia and NASA I setup the 8 planets in our solar system:
Planets.blend (304.6 KB)

Useful Links

Information about orbits and planets from Wikipedia:
https://en.wikipedia.org/wiki/Kepler's_laws_of_planetary_motion
https://en.wikipedia.org/wiki/Orbital_elements
https://en.wikipedia.org/wiki/List_of_gravitationally_rounded_objects_of_the_Solar_System

More exact numbers for the orbital elements of planets in our solar system:
https://ssd.jpl.nasa.gov/?planet_pos

Textures:
http://planetpixelemporium.com/planets.html
http://visibleearth.nasa.gov/view_cat.php?categoryID=1484

2 Likes

you might be interested in the developments of OSL in blender, a generic planet shader that would probably be excellent for this.

http://fbbdev.wordpress.com/ <- planet shader

New version out, you can now influence the rotation of the orbital plane though some more orbital elements.

@zeffii:
Interesting website, thank you for the tip. I will have a look at how to integrate visible planets (spheres with materials) into the addon.

Because there now even more parameters with strange names i need a way to show in the viewport what they are doing. I thought of drawing angles and distances with opengl, but i have no idea how to do that (yet).
If you know an addon which i could use as reference, please post a comment.

Dear Markus. This. Is awesome.

Have not tried this yet, but am about to download it now.

@zeffii - thank you for that link. Looks interesting. Been looking into modeling and texturing my own planets, but this looks like fun to play around with.

Hello again, I’m back with a new version,

I’m sure a lot of you had problems installing and activating the script. Sorry that was my fault.
Lesson learnt:
DON’T USE DOTS IN THE NAME OF THE ADDON’S .PY FILE
otherwise you can’t activate the addon

I renamed the file (“SolarSystemSimulator0.3.py” -> “Solar SystemSimulator03.py”), now it works.
Other new features:

  • In the physics-tab, activate the Solar System Simulator over the big button with the sun symbol
  • You will see a new Panel, “Calculation”
  • You can use the driver or create a F-Curve for the Location so that the Orbit is saved within the blender-file
  • With an F-Curve, you can show the Motion Path of the Object (= Orbit of the Object)

Currently I’m working on a new panel, “Surface”, to add a visible planet surface to the empties.

New version (v04), now with rotating planets and surfaces!

The new Panels:
[EDIT: The picture was from version 0.4 and is out of date]

I set up a little blend file with a simulation of the four inner planets:
[EDIT: Blend file is outdated, will only work with version 0.4]
InnerPlanets.blend (1.38 MB)

Wow! Great stuff to play with :slight_smile:
thanks for sharing

Is the scale 1 to 1 ? how does that fit in the viewport ?

@reC:
You’re right, if you had a 1 Blender Unit = 1 meter scale, the solar system would be very very big.

There is a panel in the scene tab which controls the scaling of lengths and time:


Evaluation Time: Main property for controlling the time of the simulation, set keyframes to this property if you want to stop the planets or else. Usually matches the current frame
Length and Time Exponent: The exponents for the scaling of lengths and time
Example:

  • exponent is 0 => you have a 1:1 scaling which means 1 Blender Unit = 1 km, 1 second of your animation = 1 second in the simulation
  • exponent is 6 => you have a 1:1,000,000 scaling, 1 Blender Units = 1,000,000 km, 1 second = 11.57 simulation days
  • If you make the exponent higher => everything gets smaller or faster
  • Because planets can get really small, you can increase the their size by a factor (“Planet Size Multiplier”)

You need the “Update Drivers” button if load your scene into blender again (because the driver namespace is reset everything you load a new file).

Hmm…maybe I don’t get it. What button do I push to generate the solar system?

Actually everything works over the physics-tab and the scene-tab:

[EDIT: Picture was outdated (v0.4) since v0.5 you can use the operators from the 3D-View Toolbar]

It’s very cool ! what uses did you have in mind when you started this project ? pure simulation or visualization ? both ? other ?

I was thinking this might be used in actual rendering visualisations but how would you model and place your models on the surface of mars for example ?:slight_smile:

So I have to make all the planets myself, as spheres, and add them into your system?

@Atom: Exactly. Unfortunately there is no way no automate this. You have to create the spheres yourself, texture them yourself and set up the simulation and the surfaces yourself. (Maybe I will add presets in the future)

And you need at least two objects for the simulation, one is the center, one orbits around the center. Of course you can simulate two mesh spheres without any empties (which are just placeholders). But for a more complex setup (like a planet with land, clouds and atmosphere as separate spheres) you better simulate empties.

@reC: I started writing the addon to learn Python and the Blender API. And, after I read some of the more complicated wikipedia articles, I wanted to make the simulations physical accurate.
That’s the reason why there are so many properties you can set, because the user should be able to simulate a simple circular motion as well as elliptical inclined orbits. So what you are actually simulating are objects with mass moving around other objects with mass, at this step no visualization.

After I finished the simulation part in autumn 2012, I found some time during the last weeks to tackle the visualization. The concept of the surface panel is basically “you have mesh object here, simulated object there, just parent the mesh object to the simulated object”.
Well it gets a bit more complicated if you want to set the radius of the surface in km (physical accurate scaling).

Placing individual objects on these surfaces:

You mean something like this?


The sign is a mesh object which is parented to an empty (“Text_Empty”). The empty is then used as a surface of the “Earth_Empty”.

[EDIT: Picture was outdated]

Note that an empty has no dimensions, thats why the radius is 0. This means also that you can’t scale the empty over the surface panel and if you change the “Planet Surface Multiplier” in the scene-tab, the sign may end up inside the planet.

But the sign then rotates with the Earth:


It’s pretty cool still ! I’ll play around with it when I have time !

You are the man… thank you so dearly for creating this.

How can I change time scaling in provided file?

Hello again,
during the last weeks I reworked the addon a lot. The properties for objects (obj.sssim_obj) are split into sevaral seperate collections (obj.sssim_obj, obj.sssim_orbit, obj.sssim_rotation, obj.sssim_calc, obj.sssim_surface). This means that solar systems made with the old version (v04) are incompatible with this version.
I also redesigned the surface system. Surface objects are now parented to planets or centers.
There is a new panel in the 3D-View toolbar with some operators which makes adding planets easier. Also new is drawing of orbits with OpenGL.

I have set up our Solar System in an example file: Planets.blend (299 KB)


Hey man, which version of blender was this created for ? I used this a while ago but I can’t remember which version. Do you have any plans to update this for 2.69.x ? It doesn’t seem to be working on it, or older versions.

Cheers buddy